Tracking planes for $20 or less
My new favourite toy is a cheap $20 USB TV tuner. It’s made to receive DVB-T signals, which aren’t even used in North America. So what use could I possibly have for it?
Back in February, Linux kernel developer Antti Palosaari discovered that certain USB TV tuners can be configured to send the raw, unprocessed radio signal straight to the computer for decoding in software. (They use this mode when tuning FM or DAB radio signals. Think of it as the Winmodem approach to radio.) Palosaari realized that by running the right software, almost any radio signal could be received by these tuners. Not long thereafter, the RTL-SDR project was born, allowing these tuners to be used in Linux.
I should note that receiving (and transmitting) radio signals in software is nothing new. Software-defined radio has been around for years, but the hardware required (such as the Ettus Research USRP has generally been expensive. The availability of a $20 software-defined radio receiver has truly opened up the world of radio to anyone who takes the time to learn.
Since getting my hands on a compatible TV tuner, I’ve been able to listen to police radio, pager networks, garage door openers, air traffic control, and lots more. I recently tweeted that I had succeeded in tracking the aircraft in my area by using my TV tuner as an ADS-B receiver and feeding the output into Google Earth. This caught the interest of a pilot friend of mine, so I thought I’d put together a tutorial for anyone interested in capturing these signals. Although the tutorial is specific to ADS-B, keep in mind that the software tools (and in particular GNU Radio) can be reconfigured to tune in virtually any radio signal.
So let’s get started!
- Purchase a USB TV tuner based on the Realtek RTL2832U chip. For best results, choose one that uses the Elonics E4000 tuner, which will let you tune in the widest range of frequencies, from 64 to 1700 MHz. The OsmoSDR site has a list of supported hardware to get you started. I chose the Newsky TV28T tuner, which I purchased from Aliexpress. (I paid 40 USD for two tuners, shipping included.)
- If you’re not running it already, download and install Ubuntu Desktop 12.04 LTS. I would recommend using the 64-bit version.
- Install all the available Ubuntu software updates using Update Manager and restart.
- Download, build and install GNU Radio using the build-gnuradio script. This can be done in a terminal window by running the following commands:
cd ~
mkdir build-gnuradio
cd build-gnuradio/
wget http://www.sbrac.org/files/build-gnuradio
chmod a+x ./build-gnuradio
./build-gnuradio
Note that GNU Radio is quite a large piece of software and has a lot of dependencies, so the install process can take a long time.
- Download, build and install gr-air-modes. This is the piece of software that knows how to decode the ADS-B signals that many planes transmit. In a terminal window, run the following commands:
cd ~ git clone https://github.com/bistromath/gr-air-modes.git cd gr-air-modes cmake . make sudo make install sudo ldconfig - Plug in your TV tuner, and check whether you can receive ADS-B traffic by running the following in a terminal window:
uhd_modes.py --rtlsdrIf it works, you should see output like the following:
(-42 0.0000000000) Type 11 (all call reply) from c0636c in reply to interrogator 0 with capability level 6
(-41 0.0000000000) Type 17 BDS0,5 (position report) from c078b2 at (45.199942, -75.541590) at 30050ft
(-39 0.0000000000) Type 11 (all call reply) from c078b2 in reply to interrogator 0 with capability level 6
(-39 0.0000000000) Type 17 BDS0,9-1 (track report) from c078b2 with velocity 443kt heading 259 VS 1664
(-40 0.0000000000) Type 17 BDS0,5 (position report) from c078b2 at (45.199616, -75.544069) at 30075ft
(-42 0.0000000000) Type 17 BDS0,5 (position report) from c078b2 at (45.199265, -75.546504) at 30100ft
We’re already seeing some GPS coordinates and altitudes! Press CTRL-C to stop it for now. If you don’t see any traffic, try going outside for better reception.
- To see the output in a more convenient form, we’ll use Google Earth. Download the 64-bit .deb version from the download page, and open the file to run the installer.
- For nicer-looking fonts in Google Earth, install the
xfonts-75dpiandxfonts-100dpipackages by running the following in a terminal window:sudo apt-get install xfonts-75dpi xfonts-100dpiThen log out and log back in so the new fonts will get loaded.
- Launch Google Earth.
- If Google Earth fails to launch, it may be because it can’t find libGL. (This happened on one of my two laptops.) To fix it, run the following command in a terminal window:
sudo ln -s /usr/lib/i386-linux-gnu/mesa/libGL.so.1.2 /usr/lib/libGL.so.1 - Run
uhd_modes.pyagain, this time telling it to write its output to a KML file, the format used by Google Earth. In a terminal window, run the following:uhd_modes.py --rtlsdr --kml=planes.kml - In Google Earth, select “Network Link” from the “Add” menu. Enter “Planes” in the “Name” field, then click the Browse button next to the “Link” field and choose the “planes.kml” file in the file chooser. Click on the “Refresh” tab and set a time-based refresh to occur periodically with a frequency of 5 seconds. Click “OK”, then zoom in to your location. With any luck, you should see some planes start to appear and move around!
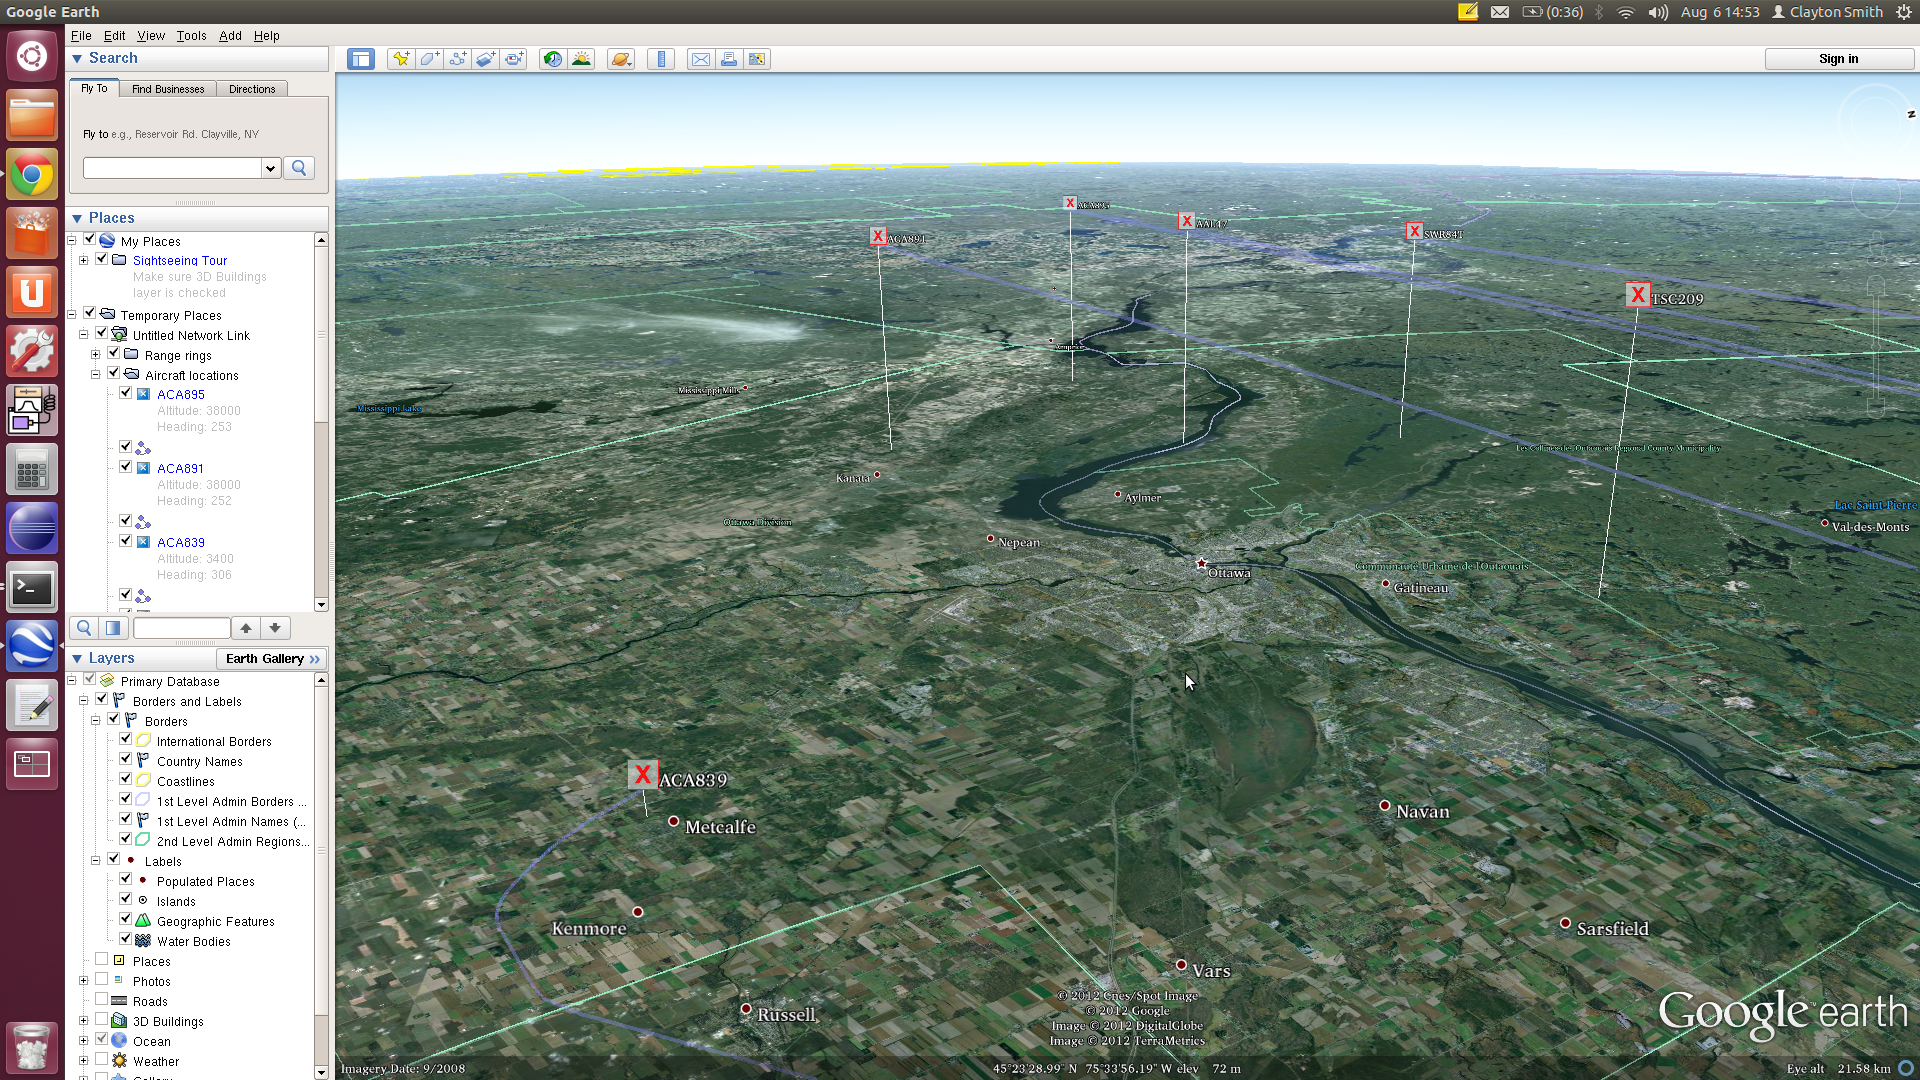
- To see more details about a plane, click the “X” that appears on the map. Or go to the “Places” section in the left sidebar and expand “Planes” and “Aircraft locations”.
Here’s a screenshot of Air Canada flight 839 coming in for a landing at YOW, with several more planes at cruising altitude in the background:
I hope you find this tutorial useful, and that you’ll do more exploring with software-defined radio once you’ve succeeded in watching planes!